Showing posts with label Microsoft. Show all posts
Sunday, 26 April 2015
Sunday, 19 April 2015
Moving\Migrating mail messages from Exchange account to Hotmail account
Taking into consideration that copy paste would not work from Outlook desktop application to Windows Live Mail and trying to Import the normal way would not work.
The key to succeed in doing that is configuring the Hotmail account using IMAP protocol on the same Outlook application.
Very detailed article about the steps:
http://www.msoutlook.info/question/765
I have tried the Microsoft Outlook 2013 procedure. Thanks!
The key to succeed in doing that is configuring the Hotmail account using IMAP protocol on the same Outlook application.
Very detailed article about the steps:
http://www.msoutlook.info/question/765
I have tried the Microsoft Outlook 2013 procedure. Thanks!
Monday, 29 December 2014
Thursday, 25 December 2014
SharePoint 2010 Custom List: Row Level Secuity
Business Case: Sharing a comprehensive list data among different stakeholders where every stakeholder can view\read only those row as per her Role\Unit
Resolution:
(1) Export the existing list data into SharePoint custom list including the column: Unit.
(2) Add a new empty temporary column: trigger update.
(3) Build a row level security based on the field row for each row.
Let's elaborate on step number (3), where we are going to create a new workflow assocuated with this list and to run on every Create\Update item.
a) Create Permissions groups within SharePoint.
Each Group will be equivalent to each Unit, same name.
b) Create the workflow:
1) Open the SharePoint site with Microsoft SharePoint Designer.
2) Navigation --> Site Objects --> Lists and Libraries --> Open that specific custom list with the data.
3) From the upper toolbar: list Workflow to create a list workflow.
4) Set Start options for the workflow: Item Created\Changed.
5) Edit Workflow.
6) Click Impersonation Step on the top toolbar to add a new Impersonation step, then remove the existing Step 1.
7) Click on the orange underline to activate the toolbar Action button.
8) Add a new action: Replace List Item Permissions.
9) Similarly, beneath it, add a new action: Add List Item Permissions.
10) Since we are interested to set the security on the item level, this workflow will do the function on the current item, replace this list in both steps with Current Item
11) To guarantee that the owners still have the permissions to access this list item, grant site owners all the permissions in the first replace step.
12) Now, to the core idea which is matching the field Unit with the equivalent group.
The result is that each row will have Read Access granted to the group members for the equivalent members of the group with the same name.
13) Save and Publish.
14) It is recommended to break the inheritance for this custom list so that the list items would be immune to any permissions changes at higher levels.
15) One time step: activate the workflow on all the items through through filling in the temporary column created earlier: Trigger Update. A simple way to do it is through filling it within the Spreadsheet view for the list. Delete the temporary column:Trigger Update from the list.
Resolution:
(1) Export the existing list data into SharePoint custom list including the column: Unit.
(2) Add a new empty temporary column: trigger update.
(3) Build a row level security based on the field row for each row.
Let's elaborate on step number (3), where we are going to create a new workflow assocuated with this list and to run on every Create\Update item.
a) Create Permissions groups within SharePoint.
Each Group will be equivalent to each Unit, same name.
b) Create the workflow:
1) Open the SharePoint site with Microsoft SharePoint Designer.
2) Navigation --> Site Objects --> Lists and Libraries --> Open that specific custom list with the data.
3) From the upper toolbar: list Workflow to create a list workflow.
4) Set Start options for the workflow: Item Created\Changed.
6) Click Impersonation Step on the top toolbar to add a new Impersonation step, then remove the existing Step 1.
7) Click on the orange underline to activate the toolbar Action button.
8) Add a new action: Replace List Item Permissions.
9) Similarly, beneath it, add a new action: Add List Item Permissions.
10) Since we are interested to set the security on the item level, this workflow will do the function on the current item, replace this list in both steps with Current Item
11) To guarantee that the owners still have the permissions to access this list item, grant site owners all the permissions in the first replace step.
12) Now, to the core idea which is matching the field Unit with the equivalent group.
The result is that each row will have Read Access granted to the group members for the equivalent members of the group with the same name.
13) Save and Publish.
14) It is recommended to break the inheritance for this custom list so that the list items would be immune to any permissions changes at higher levels.
15) One time step: activate the workflow on all the items through through filling in the temporary column created earlier: Trigger Update. A simple way to do it is through filling it within the Spreadsheet view for the list. Delete the temporary column:Trigger Update from the list.
Tip, SharePoint 2010: Easier way to change Date &Time list column types into Date Only
The normal way (Through SharePoint website)
The easy way (Through SharePoint Designer application)
Microsoft SharePoint Designer --> Open Site --> Lists and Libraries --> Select a specific list --> Edit list columns --> Filter column Type (Select Date and Time)
Double click to open column editor (right click to open Column settings, Same Dialog!!! ) --> change Display format into Date only
The easy way (Through SharePoint Designer application)
Microsoft SharePoint Designer --> Open Site --> Lists and Libraries --> Select a specific list --> Edit list columns --> Filter column Type (Select Date and Time)
Double click to open column editor (right click to open Column settings, Same Dialog!!! ) --> change Display format into Date only
Sunday, 30 November 2014
Problem: Internet Explorer 11 keeps loading Sharepoint 2010 toolbar forever; Loading....
Problem:
Proposed solution:
1) Command prompt or Run command: gpedit.msc
2) Enable Allow
3) Command prompt or Run command: ipconfig /flushdns
Thanks a lot Wilson for sharing this solution, actually my reference for this blog post!
http://sharepointegg.blogspot.com/2011/06/sharepoint-2010-ribbon-stuck-at-loading.html
Thursday, 27 November 2014
Handler "PageHandlerFactory-Integrated" has a bad module "ManagedPipelineHandler" in its module list
This command just surprisingly solved it:
%windir%\Microsoft.NET\Framework\v4.0.30319\aspnet_regiis.exe -i
This repeats IIS registration\installation although I had no problem while installing it as Windows Feature.
This command just surprisingly solved it:
%windir%\Microsoft.NET\Framework\v4.0.30319\aspnet_regiis.exe -i
This repeats IIS registration\installation although I had no problem while installing it as Windows Feature.
Wednesday, 26 November 2014
Taking a SQL server database offline fails or killing a database connection
In most cases, when the operation for taking a database offline; this is attributed to connections established to this database. The apparent solution is to close the locking connections, the below is how to force them closed.
Use [master]
GO
sp_WHO
GO
spid | ecid | status | loginame | hostname | blk | dbname | cmd
58 | 0 | sleeping| user1 | user1PC | NULL| MyDB |LOG WRITER
KILL 58
GO
Command(s) completed successfully.
P.S.
- sp_who2 provides even more details about the current connections.
- No need to mention that you must have the appropriate rights on the master database to perform this commands.
Use [master]
GO
sp_WHO
GO
spid | ecid | status | loginame | hostname | blk | dbname | cmd
58 | 0 | sleeping| user1 | user1PC | NULL| MyDB |LOG WRITER
KILL 58
GO
Command(s) completed successfully.
P.S.
- sp_who2 provides even more details about the current connections.
- No need to mention that you must have the appropriate rights on the master database to perform this commands.
Monday, 24 November 2014
Holidays calendar in an easy to import to Outlook calendar format
1.Create a new file "2015_Holidays.hol"
2. Add the required holidays text in the file in the following format:
[My 2015 Holidays] 4
New Year's day,2015/01/01
Coptic Christmas,2015/01/07
Easter,2015/04/12
Holiday #4,2015/10/20
3. Open the file where Outlook is installed to import the holidays directly to your profile calendar.
* Good reference about that same topic:
Add or delete holidays and custom events in your calendar:
http://office.microsoft.com/en-001/outlook-help/add-or-delete-holidays-and-custom-events-in-your-calendar-HP001230406.aspx
Wednesday, 5 November 2014
MS Excel: Enclose text in double quotes
Assuming that the target column with the text values is A:
1) Create a new column with the following expression: = """" &A1 & """" at the first cell. Drag\Double click to fill the whole column.
2) Copy the values from this new column, and paste them Paste Special --> Values into a third column. Drag\Double click to fill the whole column.
3) You can now delete the original column A and replace it with the column in step (2)
1) Create a new column with the following expression: = """" &A1 & """" at the first cell. Drag\Double click to fill the whole column.
2) Copy the values from this new column, and paste them Paste Special --> Values into a third column. Drag\Double click to fill the whole column.
3) You can now delete the original column A and replace it with the column in step (2)
Monday, 8 September 2014
Server Error 500 - Internal server error. There is a problem with the resource you are looking for, and it cannot be displayed.
I problem which might have kept me overnight in the office!!!
Environment:
Microsoft IIS 7.5
Windows Server 2008 R2
Cause:
Trying to share the root web folder.
Problem:
Server Error
500 - Internal server error.
There is a problem with the resource you are looking for, and it cannot be displayed.
Trials:
- Removing the share.
- Deleting the Temporary ASP.NET files
- Restating the IIS
Workaround:
1 - Creating a new web root folder and moving all the application folders to this new folder.
2 - Configuring all the application folders to point to the new folder.
Tuesday, 12 August 2014
Monday, 11 August 2014
Database diagram support objects cannot be installed because this database does not have a valid owner
TITLE: Microsoft SQL Server Management Studio
------------------------------
Database diagram support objects cannot be installed because this database does not have a valid owner. To continue, first use the Files page of the Database Properties dialog box or the ALTER AUTHORIZATION statement to set the database owner to a valid login, then add the database diagram support objects.
This error happened after an upgrade, the owner was already set as sa, so the solution was to change ownership into another login, then return it to sa.
------------------------------
Database diagram support objects cannot be installed because this database does not have a valid owner. To continue, first use the Files page of the Database Properties dialog box or the ALTER AUTHORIZATION statement to set the database owner to a valid login, then add the database diagram support objects.
This error happened after an upgrade, the owner was already set as sa, so the solution was to change ownership into another login, then return it to sa.
Tuesday, 5 August 2014
Tip: Opening Internet Properties without opening Internet Explorer
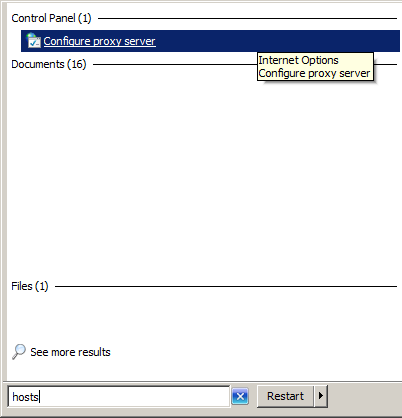
Although the Internet Options dialogue box appears as a implicit component within the Internet Explorer, it can be called separately without the need even to open the browser. This is very helpful especially if you are using a laptop like me, and within the office you need to enable the proxy settings and to disable it every time you are out of the office. Moreover, knowing that most other applications read from that place for the proxy settings, it appears to me as a very handy shortcut.
Wednesday, 18 June 2014
Wednesday, 28 May 2014
Tuesday, 13 May 2014
Overlapping content following the Microsoft Report Viewer control
The trick to avoid this behavior is to use the parameter: SizeToReportContent, such that:
<rsweb:ReportViewer ID="ReportViewer_Main" runat="server" Height="1250px" Width="700px" SizeToReportContent="True">
.
.
.
</rsweb:ReportViewer>
Assembly=Microsoft.ReportViewer.WebForms
Version=11.0.0.0
<rsweb:ReportViewer ID="ReportViewer_Main" runat="server" Height="1250px" Width="700px" SizeToReportContent="True">
.
.
.
</rsweb:ReportViewer>
Assembly=Microsoft.ReportViewer.WebForms
Version=11.0.0.0
Monday, 12 May 2014
Calling MS SQL Server user defined functions with default parameters
User Defined Function Call:
SELECT *
FROM udf_TestDef(1, DEFAULT)
Yes!! You have to insert the term default literary!
User Defined Function Sample:
CREATE FUNCTION [dbo].[udf_TestDef]
(
@Param INTEGER
@IsBigContainerPhoto BIT = 0
)
RETURNS TABLE
AS
RETURN
(
.
.
.
SELECT *
FROM udf_TestDef(1, DEFAULT)
Yes!! You have to insert the term default literary!
User Defined Function Sample:
CREATE FUNCTION [dbo].[udf_TestDef]
(
@Param INTEGER
@IsBigContainerPhoto BIT = 0
)
RETURNS TABLE
AS
RETURN
(
.
.
.
Sunday, 27 April 2014
Excel 2013: Removing a defined named range\data table
For normally defined name:
1) Formulas menu.
2) Name Manager.
3) Select the range and delete.
In my case that was a result of a query which generated the named data table:
1) Select the range from the drop down list beside the formula bar.
2) Right click on any cell within that range, and select:
Table --> Convert to Range
The reason I wanted to get rid of that named table in the first place was that filtering and sorting the data inside it was separated from the main sheet.
1) Formulas menu.
2) Name Manager.
3) Select the range and delete.
In my case that was a result of a query which generated the named data table:
1) Select the range from the drop down list beside the formula bar.
2) Right click on any cell within that range, and select:
Table --> Convert to Range
The reason I wanted to get rid of that named table in the first place was that filtering and sorting the data inside it was separated from the main sheet.
Thursday, 20 March 2014
Unable to download a pdf file using Internet Explorer over a secure SSL channel
That came out as a reported bug from one of my clients and it fairly took a significant trials and errors to figure out that it is an issue associated with Internet Explorer and not my project!!
Subscribe to:
Posts (Atom)


.png)